DIY Guide: Just How to Install a Floating Vinyl Floor
They are making a few good points about How to Install LifeProof Vinyl Flooring as a whole in this great article down below.
There is no much better connection to a home than being proactively involved in the structure as well as decorating. This aids you to incorporate your preferences in all parts of the home so that it genuinely seems like your space.
A great means to accomplish this task is to install the floorboards yourself. Thankfully, plastic floors are simple to fix as well as might not need professional abilities. You may require professional support to prevent expensive rooky mistakes.
This article is simply right for you if you are at a loss at how to mount your vinyl floorings. It discusses simple steps of setting up the vinyl floorings and supplies useful ideas to help boost the aesthetics of your floors. Allow's get right into it!
Exactly How to Mount Vinyl Floors
To obtain the best out of your vinyl floorboards, it aids to stick with the supplier's guide. Below is a stepwise guide to mounting your plastic floorboards:
Prepare the Floor
Preparing the flooring for the plastic floor installment eases the preparation procedure. Flooring preparation includes:
Prepare Installment Tools and Devices
To mount vinyl floors, you will require the list below products and also devices:
It will certainly help to have these in place before the floor installment.
Get Rid Of the Door Trim.
The door trim will certainly make it difficult for the plastic flooring to lay flat versus the doorframe. Eliminating the door trim prior to mounting the plastic floorings is vital.
Make Alleviation Cuts and also Finish Off Sides.
It is crucial to make relief cuts on your plastic floorings. Relief cuts give the floorboards room for contraction and growth. This helps to prolong the toughness of your vinyl floors.
It is likewise essential to finish off the sides of the plastic floorings. This gives the floorings a expert as well as ideal look.
Use a Double-Sided Adhesive Tape.
The double-sided adhesive tape keeps the plastic flooring in position and also quits it from moving. It is vital to utilize adhesives in flooring installment since Begin Now the floorings may not stick well without them. So, with time, they might start to peel, and also you may need to replace the boards.
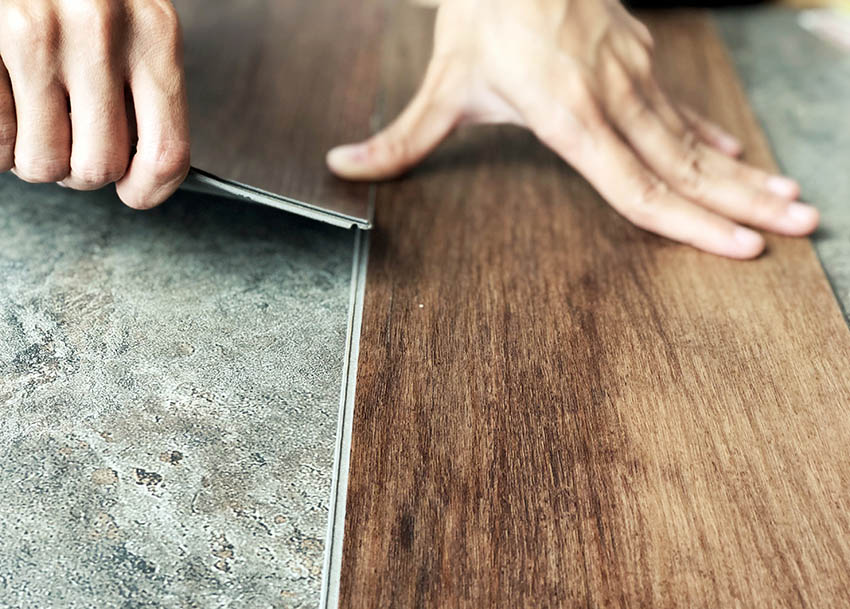
Lay the Plastic Flooring.
When laying the plastic floors, start at one corner. It is vital to comply with a regular pattern and also take your time to lay the floorboard. Make use of a roller to ravel creases or bubbles and also get rid of air pockets. This will certainly provide your floor an expert look.
Keep the Floors.
Vinyl floorings are strong and sturdy. It will certainly be affordable to take treatment of the floors and also avoid damages.
Final thought.
It is crucial to lay the plastic floors with treatment and persistence. This might be lengthy, yet the result is worth your time. If you do not have sufficient info, vinyl floor installment is easy yet may be difficult. If you are vague regarding the setup actions, it would be best to employ the solutions of an expert. They have the abilities, competence, and experience to respond to all your inquiries and overview you appropriately.
Thankfully, vinyl floors are simple to fix and also might not need specialist skills. If you are at a loss at just how to install your plastic floorings, this write-up is just right for you. It goes over simple actions of installing the vinyl floorings and also supplies valuable pointers to help improve the looks of your floorings. It is crucial to make use of adhesives in flooring installation since the floorings may not adhere well without them. Plastic floor installation is easy yet may be difficult if you do not have appropriate information.
DIY Wood Flooring Installation Guide
If you are reading this guide, the chances are that you have bought or are considering buying wood flooring online and to save even more, you are considering installing your new floor yourself. In order to decide which installation method to use (there are several), you need to consider the type of sub-floor you have. It is very important to choose the right floor and fitting method for your sub-floor.
Preparation:
Make sure the room is completely free of any obstacles, such as your old carpet or furnishings so you can concentrate on installing your flooring rather than moving things around. Ensure that the surface is clear of any dirt or debris, as well as traces of the old floor.
Floating Installation
Floating Installation is the easiest DIY installation method of wood flooring because it requires the least amount of skill or prior experience. As such this option is ideal for the newbie builder. This method involves using PVA glue to glue the tongue and groove together. An underlay is required with a floating installation to prevent contact between the floor and the sub-floor and to serve as a moisture barrier and insulation. Quality underlay will also deaden the sound of walking on the floor can make a huge difference to noise pollution. TOP TIP: If you've saved on the process so far by buying your hardwood floor online, do make sure to invest in high quality underlay. PLEASE NOTE: Due to the movement of a solid wood floor you should not use a floating installation.
Glue-down Installation
While this guide is likely to give you all the information you'll need for a Glue-down installation, always read the information that came with the floor or contact the seller if you are unsure. Glue-down installation requires the use of a bonding agent or adhesive applied directly on to the sub-floor and can be applied to both concrete and wooden sub-floors. PLEASE NOTE: always read the health and safety guidelines when working with agents or chemicals. If you are laying over a concrete sub-floor you will first need to put down a two part epoxy damp proof membrane to ensure no damp rises up into your new floor. Glue-down installations can be very stable when done properly, although you should allow a good amount of time before you walk on your floors. The adhesives used in this process need to bond to the floor and can be quite messy especially if done by a less skilled installer.
Nail-down Installation
Nail-down installation is the most straightforward of all solid wood flooring installation methods, and is only advised if you have a wooden sub-floor and plenty of time to focus on the job. When installing over plywood the direction you choose to lay the planks does not matter. However, if you are going to nail down a new floor over existing floorboards you must face the planks of the new floor in the opposite direction to the existing floorboards, essentially making a crisscross pattern. Solid wood floors are thicker; hence they need to be nailed down in order to stay in place. It is a good idea to consider hiring a nailer for large surfaces otherwise this could end up very time consuming. Typically when nailing down an 18mm-22mm solid floor you will want to use 2” long nails. Generally, people regard nail-down installation as being very exacting and time-consuming. It requires you to use specific tools and equipment, which can make this a difficult DIY job. There is a certain amount of skill and level of knowledge required for this type of installation. TOP TIP: when carrying out a nail-down installation, consider using 2mm poly foam underlay as this helps to make sliding boards into place easier and it also reduces any potential squeaking noise your floor might make when walked on.
https://www.woodandbeyond.com/blog/diy-wood-flooring-installation-guide/

Hopefully you enjoyed reading our article about Vinyl Floor Installation. Thank you for taking the time to browse our blog post. If you please take a moment to share this blog posting if you appreciated it. I praise you for your time. Please pay a visit to our website back soon.